1 Conda环境下搭建Clickhouse-fdw

由于 Clickhouse-fdw 依赖高版本的 GNU tool chain 需要使用 GCC 7+ 来编译, 并且依赖的一些第三方库的版本也比较高, 原生 CentOSrepo 不能满足依赖,所以用选用 Conda 环境来解决依赖并 build 生成动态库。

本质上 Clickhouse-fdw 是一个 postgresqlextension 动态库, 它与 Clickhouse 之间的连接是使用的 Clickhouse-odbc 库。

1.1 编译clickhouse-odbc

  1. 递归拉取 clichouse-odbcsource, --recursive 可以把项目下的 sub project 一并拉下来。

    git clone --recursive [email protected]:ClickHouse/clickhouse-odbc.git
  2. 编译Clickhouse-odbc, README里面使用的是devtoolset-8 为了解决高版本的GCC的问题,我这里用的Conda的环境,需要用conda 安装gcc 7以及其他包括cmake 14+在内的依赖包.

    cd clickhouse-odbc
    mkdir build
    cd build
    # Configuration options for the project can be specified in the next command in a form of '-Dopt=val'
    cmake -DCMAKE_BUILD_TYPE=RelWithDebInfo ..

    在第7部的时候会有报错,错误步骤是在编译 gtest 的测试 binary, 其实可以不用解决,因为在此错误之前 libclickhouseodbc.so 已经被编译出来了。

    (py3) [ec2-user@ip-172-31-46-209 driver]$ ldd libclickhouseodbc.so
        linux-vdso.so.1 (0x00007ffd111b4000)
        libpthread.so.0 => /lib64/libpthread.so.0 (0x00007f4fcd072000)
        libstdc++.so.6 => /home/ec2-user/miniconda3/envs/py3/lib/libstdc++.so.6 (0x00007f4fcd616000)
        libgcc_s.so.1 => /home/ec2-user/miniconda3/envs/py3/lib/libgcc_s.so.1 (0x00007f4fcd602000)
        libc.so.6 => /lib64/libc.so.6 (0x00007f4fcccc7000)
        librt.so.1 => /lib64/librt.so.1 (0x00007f4fccabf000)
        libodbcinst.so.2 => /home/ec2-user/miniconda3/envs/py3/lib/libodbcinst.so.2 (0x00007f4fcc8a4000)
        libicuuc.so.58 => /home/ec2-user/miniconda3/envs/py3/lib/libicuuc.so.58 (0x00007f4fcc6f1000)
        /lib64/ld-linux-x86-64.so.2 (0x00007f4fcd573000)
        libm.so.6 => /lib64/libm.so.6 (0x00007f4fcc3b1000)
        libdl.so.2 => /lib64/libdl.so.2 (0x00007f4fcc1ad000)
        libicudata.so.58 => /home/ec2-user/miniconda3/envs/py3/lib/./libicudata.so.58 (0x00007f4fca8ab000)
    

    查看是否有找不到的动态库地址。

1.2 编译clickhouse-fdw

clickhouse-fdw 依赖 postgresql-dev 的包,所以还是要先 yum postgresql-dev 相关的依赖,然后再用 Conda 安装 postgresql 11 的版本。 Conda 安装的 postgresql 没有写入 systemctl, 需要手动配置启动。 Conda 安装的 postgresql pg_config 输出的系统变量里"CC"的指向路径是有问题的。

pg_config
....
CC = /tmp/build/80754af9/postgresql-split_1545233302450/_build_env/bin/x86_64-conda_cos6-linux-gnu-cc

这里 CC 是只编译 postgresql 的编译器路径,系统里根本没有这个,需要修改 Makefile 里面强制指向 CC 到系统的 gcc 编译器,否则会报错。

(py3) [ec2-user@ip-172-31-46-209 clickhousedb_fdw]$ make USE_PGXS=1
rm -rf libclickhouse-1.0.so lib/*.o
make -f lib/Makefile
make[1]: 进入目录“/home/ec2-user/workspaces/clickhousedb_fdw”
g++ -Wall -Wpointer-arith -O2 -fPIC -O0 -g3 -Wno-unused-variable -fPIC -Wall -I. -Ilib   -c -o lib/clickhouse-client.o lib/clickhouse-client.cpp
g++ -Wall -Wmissing-prototypes -Wpointer-arith -Wdeclaration-after-statement -Wendif-labels -Wmissing-format-attribute -Wformat-security -fno-strict-aliasing -fwrapv -fexcess-precision=standard -Wno-format-truncation -march=nocona -mtune=haswell -ftree-vectorize -fPIC -fstack-protector-strong -fno-plt -O2 -pipe -I/home/ec2-user/miniconda3/envs/py3/include -fdebug-prefix-map==/usr/local/src/conda/- -fdebug-prefix-map==/usr/local/src/conda-prefix -fPIC lib/clickhouse-client.o -o libclickhouse-1.0.so -L/home/ec2-user/miniconda3/envs/py3/lib -L. -lclickhouse-1.0 -lodbc -lodbcinst -Wl,-O2 -Wl,--sort-common -Wl,--as-needed -Wl,-z,relro -Wl,-z,now -Wl,--disable-new-dtags -Wl,-rpath,/home/ec2-user/miniconda3/envs/py3/lib -L/home/ec2-user/miniconda3/envs/py3/lib  -L/home/ec2-user/miniconda3/envs/py3/lib -Wl,--as-needed -Wl,-rpath,'/home/ec2-user/miniconda3/envs/py3/lib',--disable-new-dtags -fPIC -shared -ldl -lstdc++ -L -lodbc
make[1]: 放弃循环依赖 test <- 755 test 。 g++ -o0 -g3 -wno-unused-variable -iinclude lib example odbc_test.o -o -ldl -l. -lclickhouse-1.0 -lodbc -lodbcinst make[1]: 离开目录“ home ec2-user workspaces clickhousedb_fdw” make -f makefile 进入目录“ 放弃循环依赖 <- 对“all”无需做任何事。 usr bin install -c -m libclickhouse-1.0.so miniconda3 envs py3 < pre>

最后运行 make USE_PGXS=1 install 把对应的动态库放到制定位置。

2 配置 postgresqlclickhousedb-fdw 连接 Clickhouse

先配置 clickhouse 表并导入数据

CREATE DATABASE test_database;

USE test_database;

CREATE TABLE tax_bills_nyc
(
bbl Int64,
owner_name String,
address String,
tax_class String,
tax_rate String,
emv Float64,
tbea Float64,
bav Float64,
tba String,
property_tax String,
condonumber String,
condo String,
insertion_date DateTime MATERIALIZED now()
)
ENGINE = MergeTree PARTITION BY tax_class ORDER BY (owner_name)

curl -X GET 'http://taxbills.nyc/tax_bills_june15_bbls.csv'  \
| clickhouse-client --input_format_allow_errors_num=10 \
--query="INSERT INTO test_database.tax_bills_nyc FORMAT CSV"

配置启动 postgresql,首先要初始化 postgresq

initdb pdatta

这个时候会以 ec2-user 用户创建一个 pdata 的目录,里面会有生成 postsql 的默认配置。 修改 pdata 目录下的两个文件 postgresql.confpg_hba.conf , 第一个文件修改 listernling portbind ip 改为 0.0.0.0, 第二个文件修改 trustip, 这样就可以从外部访问 postgresql.

pg_ctl start -D pdata -s -w -t 300

如果需要停止服务可以运行

pg_ctl stop -D pdata -s -m fast

创建 clickhouse-fdw extension

CREATE EXTENSION clickhousedb_fdw;

创建 SERVER, 这里需要指定 clickhouse 的地址为 host, 以及之前编译的 clickhouseodbc.so 地址作为 driver 的地址, dbname 也是 clickhouse 上的 =dbname=。

CREATE SERVER clickhouse_svr FOREIGN DATA WRAPPER clickhousedb_fdw OPTIONS(dbname 'test_db', driver '/home/ec2-user/workspaces/clickhouse-odbc/build/driver/libclickhouseodbc.so', host '172.31.37.147');

创建user mapping

CREATE USER MAPPING FOR CURRENT_USER SERVER clickhouse_svr;

创建外表, 并且表名需要跟 clickshouse 的表名一致。

CREATE FOREIGN TABLE tax_bills_nyc
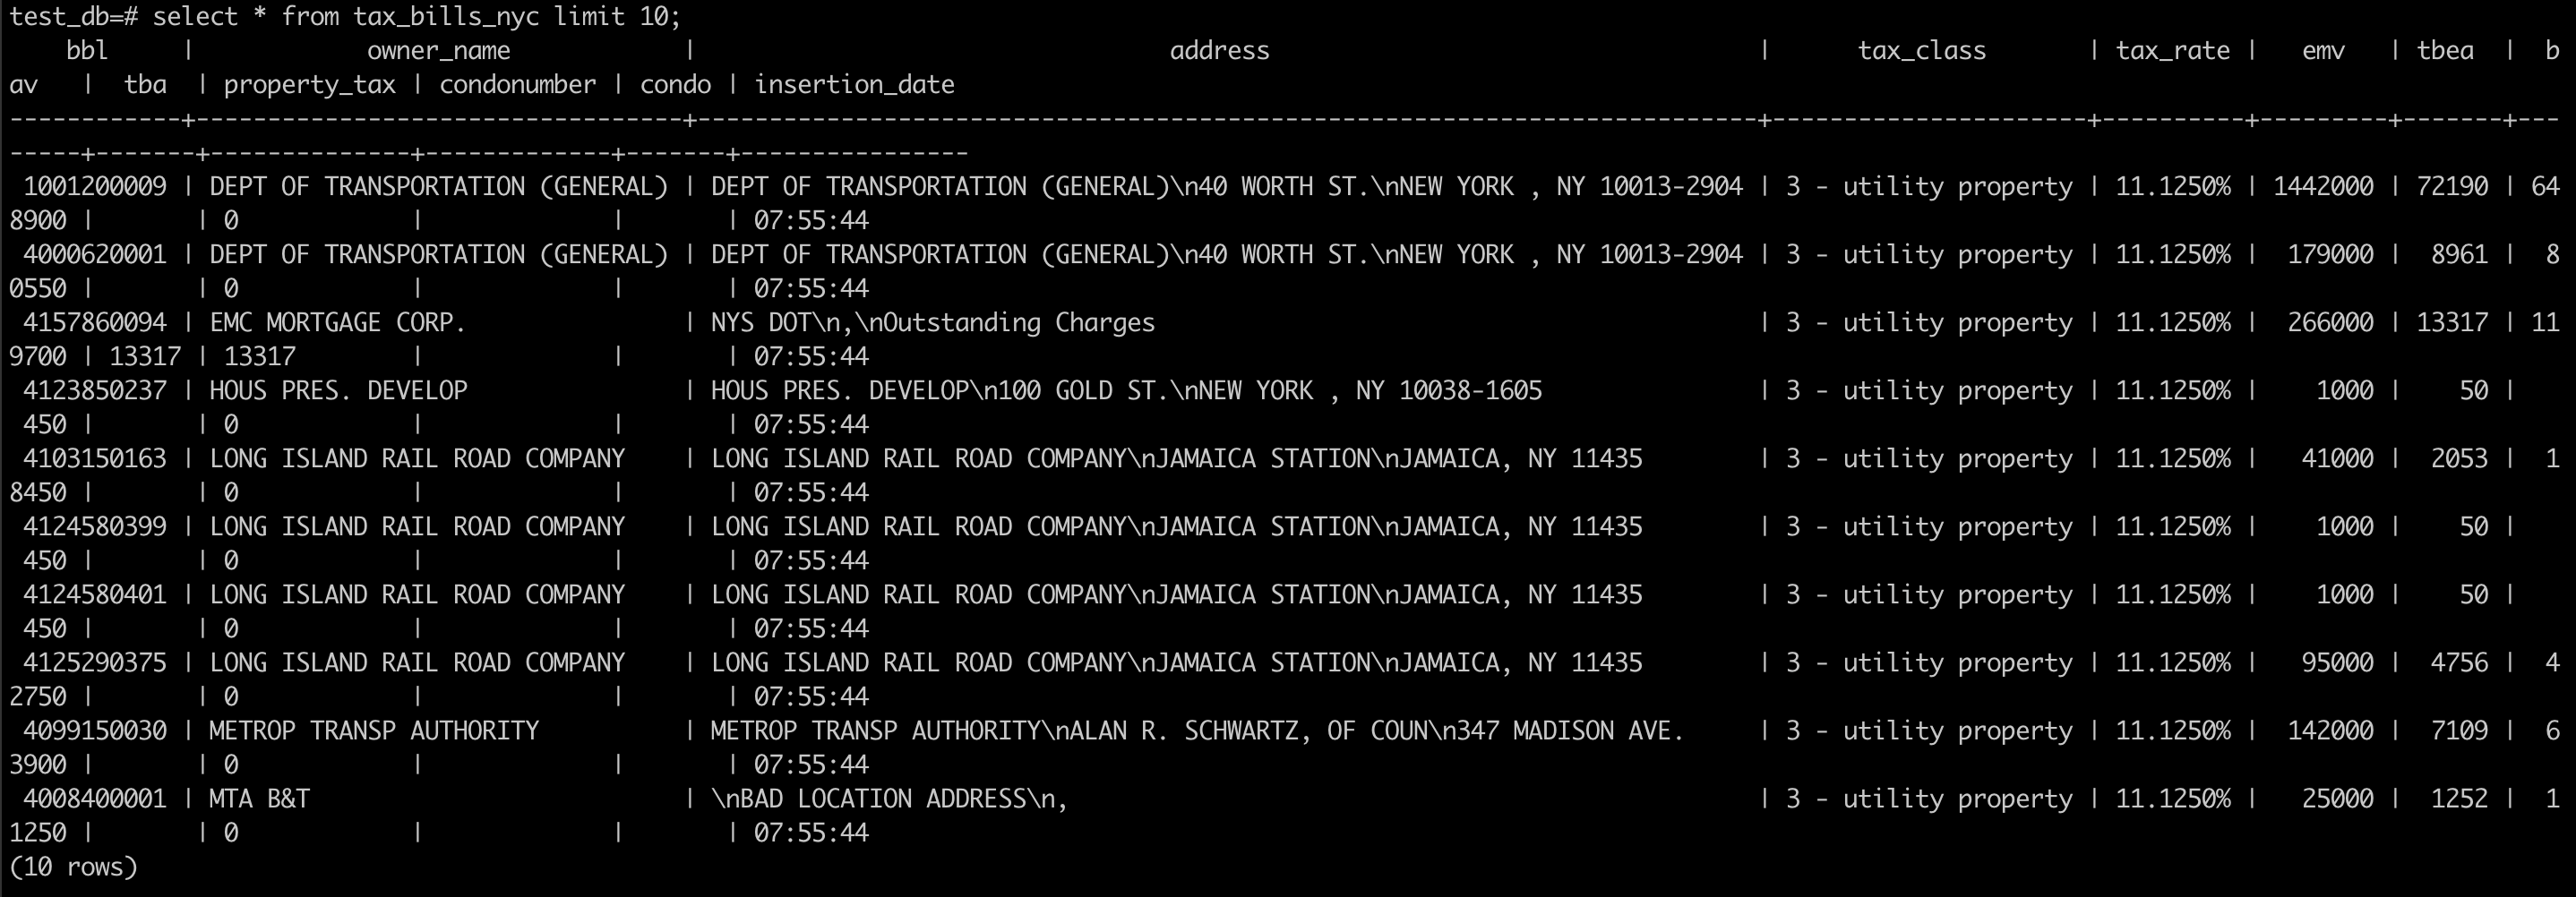
(
bbl int8,
owner_name text,
address text,
tax_class text,
tax_rate text,
emv Float,
tbea Float,
bav Float,
tba text,
property_tax text,
condonumber text,
condo text,
insertion_date Time
) SERVER clickhouse_svr;

查询数据 clickhouse_fwd_query_results.png

Date: 2020-08-13

Author: shawn-win11

Created: 2022-09-24 Sat 15:03

Validate

1 问题描述

最近在做项目的时候遇到稍微复杂的一个场景,需要夸多组件数据处理。具体流程如下:

  • google bigquery 大叔据平台将计算和聚合过的每小时结果集存在 pandasdataframe 中。
  • pandas 的数据与 postgresql 数据库同步, 将结果集中有些字段为空的部分从 postgresq 中再回填给 pandasdataframe 中。
  • 合并之后的结果在更新入 postgresq, 同时写入 hive 表中便于后期用 presto 做长查询。

本来这套逻辑似乎更适用于 spark map reduce 来做,但是由于 bigquery 的计算分布在几十个 gcp project 里面。 spark 调用 bigquery 的话配置权限很麻烦,同时结果集每小时的大小也只在三万到十万级别。 计算任务是在 bigquery 中完成, 所以这时候调用 spark 似乎有点重了。所以决定使用 python pandas 配合别的大数据主件。

bigquer 每次会计算历史10几个小时的聚合结果集,按照每小时3-10万的量算下来,最多一次合并 postgresq 的量级在百万以内。 这个量级在合并的时候从 pgsql 拉数据下来,再在内存中用 pandasjoin 明显不是明智的选择。 从 pgsqlselect 百万记录下来 pandas join 完之后再上传 pqsql ,再 update 无疑增加了计算的复杂度。 所以我的选择是: 按小时将 pandas dataframe 上传到 pgsql 临时表, 直接在数据库中做 joinupdate pgsql 中的记录

因此我们需要实现的就是如何优雅的把 pandas dataframe 上传到 pgsql 的临时表,并提供接口操作临时表和已有的表做运算。

2 解决方案

虽然 pandas 自己也带了数据库连接的接口,但是过于简单,不能满足复杂的处理过程。 但是又不想用很重的库如 sqlalchemy 等支持 ORM 的库,觉得还是对程序员不友好。而且要写很多手脚架来适配。

所以这里推荐我常用的数据库连接库 records

records.jpg

  • 动态解析 pandas dataframe 对应的数据库临时表的 schema

    def infer_pd_schema(df):
    '''infer pandas dataframe schema
    '''

    schema = []
    type_map = {
    'int64': 'int8',
    'object': 'varchar(512)',
    'float64': 'float8'
    }
    for col, tp in df.dtypes.items():
    t = type_map[tp.name]
    item = f'''"{col}" {t}'''
    schema.append(item)
    return ', '.join(schema)

    如果要增加跟多复杂的类型作为 pandas dataframepgsql 的映射,可以往 type_map 里面添加对应的类型。 或者你也可以修改非 pgsql 的类型数据库对应的字段,以匹配你真实的需求。

  • 上传 pandas dataframe 数据到数据库临时表

    def create_temp_table_with_df(conn, table, dataframe):
    '''conn is a pgsql connect transaction
    table is the name of the temp table and df is the pandas dataframe
    '''

    schema = infer_pd_schema(dataframe)
    conn.query(f'drop table if exists {table}')

    query = f'''create TEMPORARY table if not exists {table}
    ({schema});'''

    logger.info(query)
    conn.query(query)

    # After testing, threads will not improve the uploading performance
    # here is a tricky way to upload a pandas dataframe to pgsql without "insert" query.
    # 600,000 records can be delivered within secs.

    with tempfile.NamedTemporaryFile() as tf:
    name = tf.name
    logger.info(f'creating temp data file {name}')
    dataframe.to_csv(name, header=True, index=False)
    query = f'''
    copy {table} from STDIN WITH (FORMAT CSV, HEADER TRUE)
    '''

    rconn = conn._conn.connection
    cursor = rconn.cursor()
    with open(name, 'r') as f:
    cursor.copy_expert(query, f)
    rconn.commit()
    logger.info('upload data done')

    pandas 的数据量很大比如几百万条记录时, sql insert 操作的性能往往不会很好。即便是使用多线程操作,性能的提升也是不明显。 这里我采用了 pgsqlcopy 命令, 很 tricky 的深入了 records 库的低层 connection 调用方法。 百万级的记录上传只需要秒级就可以完成。

  • pandas dataframe 的临时表与数据库中已经有的表做联合操作

    def query_pg_with_df(table, dataframe, sql):
    '''Temp upload pandas dataframe to pgsql for interaction with tables in pg.
    return a pandas dataframe
    '''

    pgdb = records.Database(
    'postgres://{host}/{db}?user={user}&amp;password={pwd}'.format(
    host=PG_SQL_HOST,
    db=PG_SQL_NAME,
    user=PG_SQL_USER,
    pwd=PG_SQL_PASS)
    )

    try:
    with pgdb.transaction() as conn:
    create_temp_table_with_df(conn, table, dataframe)
    logger.info(sql)
    res = conn.query(sql)
    return pd.DataFrame(res.as_dict())
    except Exception as e:
    logger.error(e.msg)
    finally:
    pgdb.close()

    这里函数中的 table 变量是指后面 pandas dataframe 上传至 pgsql 之后的临时表名。变量 sql 就可以操作这个临时表和数据库里面其他表做正常的类似 join 的操作。 返回的结果是一个 pandas dataframe 。 这样就可以在内存中做后续进一步的处理了。

3 总结

  • 如果采用 sql insert 一条条纪录的话,性能不能符合要求,所以采用了 copy csv 的方式。
  • 提供了 pandas dataframe 如何与 pgsql 里的表做交互比如 join 等操作。
  • 可以根据实际采用的 sql 服务类型,修改此代码 portingmysql 或者别的 sql service

Date: 2020-03-18

Author: shawn-win11

Created: 2022-09-24 Sat 14:46

Validate

1 准备工作

  • 首先你需要一个 LinuxVPS ,以及一个可以用的域名。 VPS 的操作系统可以选 Ubuntu 或者 centos 等主流的 Linux 系统。 同时删除原来系统里面的 sentmail 相关的 package
  • 在你的域名供应商的平台上配置好你的域名解析。 一般情况下,需要配置3种域名解析类型, 分别是 A, MX, TXT 下面是我的配置, 我用的是阿里云的域名服务: domain_configure.png
  • VPS 上安装好 postfixdovecotsasl-dev 等软件。 libsaslpostfixdovecot 认证用的。你需要根据你的 VPS 操作系统的类型选择对应的包管理工具安装这些包。

    postfix-2.10.1-7.el7.x86_64
    dovecot-2.2.36-3.el7_7.1.x86_64
    dovecot-mysql-2.2.36-3.el7_7.1.x86_64
    cyrus-sasl-lib-2.1.26-23.el7.x86_64
    cyrus-sasl-plain-2.1.26-23.el7.x86_64
    cyrus-sasl-2.1.26-23.el7.x86_64
    
  • VPS 上创建一个用户,你的邮箱就是这个用户名,目前没有尝试用 LDAP 服务和 postfix 服务做集成。
  • 最好还能有一个可以有一个常用的别的邮箱如 gmail 等作为 relay sever, 这是因为 私有的邮件服务器发送出去的邮件会被认为是垃圾邮件 。 据说是可以配置 domainTXT 类型的记录可以解决这个问题,但是我没尝试成功。

2 配置的详细过程

2.1 配置SSL证书

2.1.1 生成私有证书

可以手动生成私有证书, 也可以通过acme tools 生成对应的SSL证书。

  • 生成根证书及私钥

    openssl genrsa -out private/cakey.pem 1024 #生成CA根证书私钥
    openssl req -new -x509 -key private/cakey.pem -out cacert.pem #生成CA根证书
  • 生成服务器证书私钥、证书

    openssl genrsa -out private/yourdomain.key 1024
    openssl req -new -key private/server.key -out crl/yourdomain.csr #生成证书请求文件,可提供认证CA签核,或自签名。
    openssl ca -in crl/server.csr -out certs/yourdomain.crt #自签名证书

最后将生成的 keycrt 文件放到 /etc/ssl/ 下对应的 certs , private 目录下面即可。

2.2 配置Postfix

  • 编辑 /etc/postfix/main.cf 文件,配置域名,证书并起用 SSL 以及 sasl 的选项。

    myhostname = xxxxx.com
    mydomain = xxxx.com
    smtpd_use_tls = yes
    smtp_tls_mandatory_protocols = !SSLv2, !SSLv3
    smtpd_tls_mandatory_protocols = !SSLv2, !SSLv3
    smtpd_tls_cert_file = /etc/pki/tls/certs/yourdomain.crt
    smtpd_tls_key_file = /etc/pki/tls/private/yourdomain.key
    smtpd_tls_session_cache_database = btree:/etc/postfix/smtpd_scache
    smtpd_sasl_type = dovecot
    smtpd_sasl_path = private/auth
    smtpd_sasl_auth_enable = yes
    smtpd_sasl_security_options = noanonymous
    smtpd_sasl_local_domain = $mydomain
    smtp_sasl_password_maps = hash:/etc/postfix/sasl_passwd
    

    myhostname , mydomain 填上你真实的域名, 同时,修改真实的 ssl 证书的路径。

  • 编辑 /etc/postfix/generic 文件。 添加一行到文件最后面

    @domainname   xxxxx.gmail.com
    

    其中 domainname 替换为你申请的域名, xxxxx.gmail.com 为你之前准备的可以作为 relay server 的邮箱。 配置到这里,表示使用该账号发送邮件出去,目的是为了避免你发出去的邮件被认为是垃圾邮件。

  • 编辑或创建 /etc/postfix/sasl_passwd 文件。 添加一行到文件最后面

    [smtp.gmail.com]:587    [email protected]:password
    

    这里是配置当使用 gmail 的作为 SMTPrelay sever 的时候,使用的账号和密码。 accountpassword 替换为你真实的用户名和密码。

  • 编辑 /etc/postfix/master.cf 文件。 mastercf.png

2.3 配置Dovecot

  • 编辑 /etc/dovecot/dovecot.conf 文件, 确认支持的协议为 imappop3

    protocols = imap pop3
    
  • 编辑 /etc/dovecot/conf.d/10-auth.conf ,确认以下配置:

    disable_plaintext_auth = no
    auth_mechanisms = plain login
    
  • 编辑 /etc/dovecot/conf.d/10-ssl.conf, 确认开启了 ssl 以及使用了正确的证书:

    ssl = yes
    ssl_cert = </etc/pki/tls/certs/yourdomain.crt
    ssl_key = </etc/pki/tls/private/yourdomain.key
    

2.4 生效配置,重启服务

  • 更新 postfix lookup table

    sudo postmap /etc/postfix/sasl_passwd
    sudo postmap /etc/postfix/generic
  • 重启 postfix=, =dovecot 服务

    sudo systemctl restart postfix
    sudo systemctl restart dovecot
  • 开机启动 postfix, dovecot 服务

    sudo systemctl enable postfix
    sudo systemctl enable dovecot

2.5 确认以及配置防火墙

下面是 postfix, dovecot 使用到的端口, 配置 iptables 打开这些端口。

Protocols Usage Plain Text/ encrypted session Encrypted session only
POP3 Incoming mail 110 995
IMAP Incoming mail 143 993
SMTP Outgoing mail 25 465
Submission Outgoing mail 587  

3 测试功能

在测试 smtpimap 协议的时候, 对 encrypted session only 使用的端口默认是需要用 openssl 来访问的。 而非 encrypted 可以直接使用 telnet 来测试。

  • 测试 SMTP 服务 调用 openssl 访问服务器的 465 端口:

    openssl s_client -connect mail.example.com:465

    返回 ssl 协商的结果

    New, TLSv1.2, Cipher is ECDHE-RSA-AES256-GCM-SHA384
    Server public key is 4096 bit
    Secure Renegotiation IS supported
    Compression: NONE
    Expansion: NONE
    No ALPN negotiated
    SSL-Session:
        Protocol  : TLSv1.2
        Cipher    : ECDHE-RSA-AES256-GCM-SHA384
        Session-ID: 4D22C02B32E6B83A7380CE7C69A69FEE3985CE7B653EB423CDCA29940
        Session-ID-ctx:
        Master-Key: 9E10F874F9052D5EE47DE164A3DC95A008A3829D6E7CBD071473D9313ADC3FD9DE9DE
        PSK identity: None
        PSK identity hint: None
        SRP username: None
        TLS session ticket lifetime hint: 3600 (seconds)
        TLS session ticket:
        0000 - 07 ad 7b 9e c4 12 81 3f-13 06 ed c9 72 3a 08 e7   ..{....?....r:..
        0010 - 0e f2 72 84 70 18 47 17-94 b2 05 94 1a a7 6a 6c   ..r.p.G.......jl
        0020 - c5 37 04 ee f7 c0 36 0f-29 44 67 a9 cb f6 91 14   .7....6.)Dg.....
        0030 - 72 b6 21 45 fa 82 3b 8e-51 76 5b 4a 2e 6c 26 2a   r.!E..;.Qv[J.l&*
        0040 - 15 0c a3 3d 2c ed de ee-41 04 26 0c 89 93 c3 4f   ...=,...A.&....O
        0050 - e9 84 a0 46 68 73 b7 f4-94 3f 46 a9 af 37 a4 7f   ...Fhs...?F..7..
        0060 - 2f 3c 73 bc 43 8b 75 ac-5f 33 10 60 f6 d4 ca 74   /<s.C.u._3.`...t
        0070 - a6 60 49 8f bc 7e be 73-1e 47 c5 6d 50 21 95 53   .`I..~.s.G.mP!.S
        0080 - 9b 78 82 d6 0d d5 32 20-eb 94 50 bc a6 b1 6f fe   .x....2 ..P...o.
        0090 - 03 ee 80 4d 09 35 47 14-e4 5d aa d2 18 1f c7 ee   ...M.5G..]......
        00a0 - ca 11 a6 c1 3f d3 66 42-df 3b 4d 66 0e 7e 95 89   ....?.fB.;Mf.~..
        00b0 - 62 d0 69 76 3b fd 74 7a-d7 86 d5 6a d0 23 f8 b3   b.iv;.tz...j.#..
    
        Start Time: 1584262970
        Timeout   : 7200 (sec)
        Verify return code: 18 (self signed certificate)
        Extended master secret: no
    ---
    220 mail.example.com ESMTP Postfix
    

    输入 auth login plain 的命令, 后面跟上你的用户名密码的 base64 编码。 其中 account, password 用你真实的账号替换。

    echo -ne "\0account\0password" | base64
    220 machineheart.tech ESMTP Postfix
    AUTH LOGIN PLAIN AGFjY291bnQAcGFzc3dvcmQ=
    501 5.5.4 Syntax: AUTH mechanism
    AUTH LOGIN
    334 VXNlcm5hbWU6
    

    看到类似的返回即表示验证成功。后面即可以使用 smtp 的常用命令类似 mail from:, rcpt to: 去发送邮件了。

  • 测试 IMAP 服务 与 smtp 类似,也是使用 openssl 来测试 993 端口。

    openssl s_client -connect mail.example.com:993
     *tag login account password*
     tag OK [CAPABILITY IMAP4rev1 LITERAL+ SASL-IR LOGIN-REFERRALS ID ENABLE IDLE SORT SORT=DISPLAY THREAD=REFERENCES 
     THREAD=REFS THREAD=ORDEREDSUBJECT MULTIAPPEND URL-PARTIAL CATENATE UNSELECT CHILDREN NAMESPACE UIDPLUS LIST-EXTENDED 
     I18NLEVEL=1 CONDSTORE QRESYNC ESEARCH ESORT SEARCHRES WITHIN CONTEXT=SEARCH LIST-STATUS BINARY MOVE 
     SNIPPET=FUZZY SPECIAL-USE] Logged in
     *tag list "" "*"*
     * LIST (\HasNoChildren \Sent) "." Sent
     * LIST (\HasNoChildren \Drafts) "." Drafts
     * LIST (\HasNoChildren) "." "Deleted Items"
     * LIST (\HasNoChildren) "." INBOX
    tag OK List completed (0.001 + 0.000 secs).
    

Date: 2020-03-15

Author: shawn-win11

Created: 2022-09-24 Sat 14:46

Validate